Sticky Header Example
This is a simple example of Sticky Headers in List Component of NativeBase made with Native ListView, NativeBase and Create React Native App tool. Detailed Setup instructions can be found below.
Note: Sticky Header support is currently unavailable for android in React Native ListView. It will soon be available, check out this issue.
Find Full Code here
1. Aim
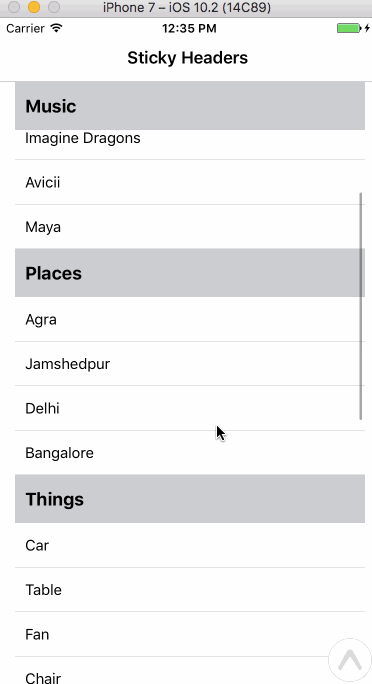
We aim to create a simple App that implements sticky headers as shown in the GIF above.
2. Installation
Create React Native App: Use CRNA tool to create an App like this
$ npm install -g create-react-native-app
$ create-react-native-app my-app
$ cd my-app/
$ npm start
NativeBase
npm install native-base@2 --saveConfigure dependencies
react-native link
Important: Additional steps are required to import fonts from native base. Refer to this
3. Setting Things Up
With all required Libraries installed, we can start with some real coding. In the root of your project create a folder src. Inside this folder we create a file by the name of Application.js.
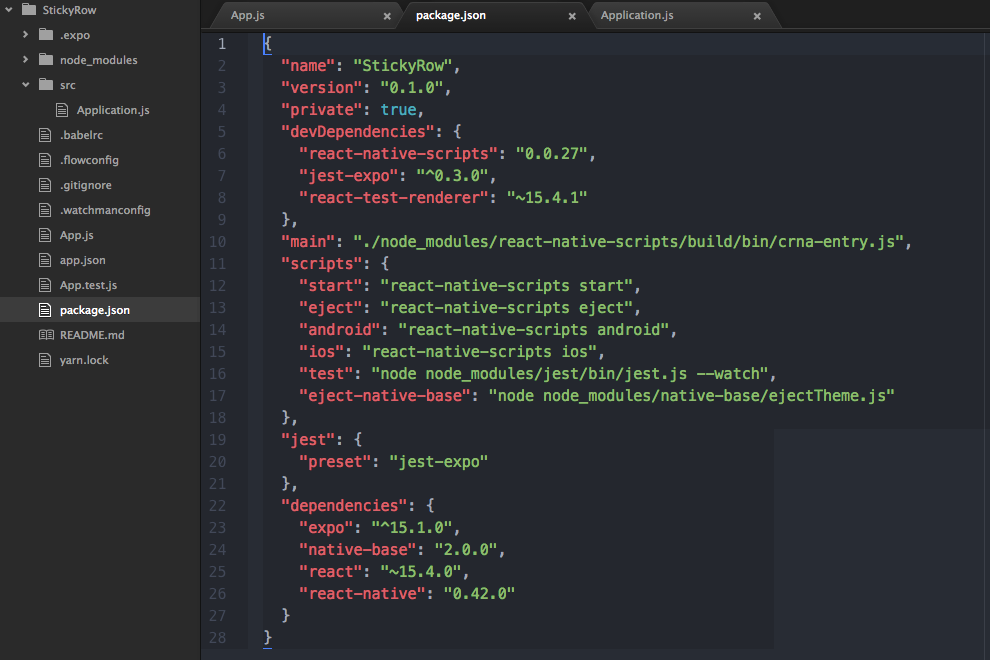
Note: You might have some problems setting up the project due to version conflicts, make sure you use same versions as mentioned below in the package.json
By the end of all this your project structure and package.json file should look something like this.
4. Making our List Component
In your Application.js inside src folder add the following code.
Code src/Application.js
import React from 'react';
import Expo from 'expo';
import { ListView, View } from 'react-native';
import { List, ListItem, Container, Content, Header, Title, Body, Text } from 'native-base';
export default class Application extends React.Component {
  constructor(){
    super();
    this.state= {
      isReady: false,
      dataSource : new ListView.DataSource({
        rowHasChanged           : (row1, row2) => row1 !== row2,
        sectionHeaderHasChanged : (s1, s2) => s1 !== s2
      })
    };
  }
  populateList() {
    this.setState({
      dataSource : this.state.dataSource.cloneWithRowsAndSections([
        ["Movies","Prestige","Interstellar","Dark Knight", "Neighbours"],
        ["Music","Nirvana", "Imagine Dragons", "Avicii","Maya"],
        ["Places","Agra","Jamshedpur","Delhi", "Bangalore"],
        ["Things","Car","Table","Fan", "Chair"],
        ["People","Sankho","Aditya","Himanshu", "Kuldeep"],
        ["Roads","NH-11","MG Road","Brigade Road", "Nehru Road"],
        ["Buildings","Empire State","Burj Khalifa","Caspian", "Narnia"]
      ])
    });
  }
  async componentWillMount() {
    this.populateList();
    await Expo.Font.loadAsync({
      'Roboto': require('native-base/Fonts/Roboto.ttf'),
      'Roboto_medium': require('native-base/Fonts/Roboto_medium.ttf'),
    });
    this.setState({isReady: true});
  }
  renderSectionHeader(sectionData, sectionID) {
    return (
      <ListItem >
        <Text>{sectionData[0]}</Text>
      </ListItem>
    );
  }
  renderRow(rowData, sectionID, rowID) {
    console.log(rowID,rowData,sectionID, "renderRow");
    if(rowID == 0){
      console.log(rowData, "0 rowId");
      return null;
    }
    return (
      <ListItem>
        <Text>{rowData}</Text>
      </ListItem>
    );
  }
  render() {
    if (!this.state.isReady) {
      return <Expo.AppLoading />;
    }
    return (
      <Container>
        <Header>
          <Body>
            <Title>Sticky Headers</Title>
          </Body>
        </Header>
        <List
          dataSource={this.state.dataSource}
          renderRow={this.renderRow}
          renderSectionHeader={this.renderSectionHeader}
        />
      </Container>
    );
  }
}
Explained
- In our constructor, we initialize our state with a
dataSourceobject. Use similar syntax to initialize theListView.dataSource. async componentWillMountfunction is used to load fonts for NativeBase as mentioned in previous examples. Check out this example.populateListfunction creates our dataSource object to be used by our list.dataSource.cloneWithRowsAndSectionsfunction will convert data into a ListView Map. Here we have used dummy data in a simple format, implementation can vary according data structure.- Next we simply place our
List(wrapper around ListView) component from NativeBase and pass data as props as shown.<List dataSource={this.state.dataSource} renderRow={this.renderRow} renderSectionHeader={this.renderSectionHeader} /> - In the
renderRowprop we pass our defined function.rowData, rowID and sectionIDare the available arguments with the function.
We simple return a React component with respective data as shown.
ForrowID == 0we return null because it is the section header element. We do not want to display it as a list item. - Similarly we implemented
renderSectionHeaderfunction, returning section headers, as shown above.
5. Wrapping Up
With our component made, we simply import the component in our App.js file and place it inside the render funtion.
Build and run.